Tuesday, November 30, 2010

Spindle Santas


We have a collection of spindle Santas that I have bought as presents for my husband over the past few years.  They are made by an amazing local artist named Barbara Tierney and we love putting them out every year.  The story as to why I bought them is one of those inspiring, sad, frustrating, happy, and celebratory stories.


The story starts back in 2005 when my husband, who is an academic, was madly finishing a book he had been writing all year.  He assured me it would be completed by the end of the year.

When I was out at a local Christmas craft show in Toronto and saw these spindle Santas,  I was immediately taken with Barbara's amazing talent, but also loved that she used vintage staircase spindles.  We got to talking and she said that she could personalize them in any colour, shape, style etc.  I took her card and then contacted her later to see if she could make me one to commemorate the completion of my husband's book.  

That Christmas I gave hubby the short red one on the left holding a copy of his book.  


Don't you think Santa looks a little worn out - pretty much how my husband looked at the time.  Any of you who know writers will know that it always takes longer than you think to get a book finished and off to the publisher.  Well Christmas 2005 came and went and we all enjoyed our new spindle Santa - and hubby contiued to write! 

During 2006 the one book hubby was writing, morphed into four books.  By Christmas 2006 hubby assured me that this was it - all four books were going to be done within a month or so.   I contacted Barbara again and had her make two more spindle Santas to give to my husband for Christmas.  

This time I had her paint a Santa holding the remaining three volumes -


and a Santa wearing sunglasses and holding a bottle of beer - relaxing!


You might think that is the end of the story - but oh no!  It's never over till it's over when you are writing a book.   Just as my husband was finishing his books in February 2007, the publisher told him they were not going to honour the contract and would not be publishing any of the books.   That was a dose of bad news, I can tell you.  So my husband wrote to other publishers and finally found one to publish two of the four books, but they had to have a different title and needed to have more work done on them since the new books would no longer be part of a set.   Sometimes things work out for the best, though, and according to my husband, all that extra work on the books actually gave him the time and incentive to really improve them. 

Both books got submitted to the new publisher by June 2007 and one was published later that year and the other in early 2008.   So for Christmas 2007, I gave hubby two more spindle Santas each holding one of his books.  


In September 2008 we had a book launch party to celebrate the publishing of the books with family and friends.  Since the books were about a 19th century English periodical, an afternoon tea seemed very fitting.  I've included a few photos of our afternoon tea because it was just so much fun.
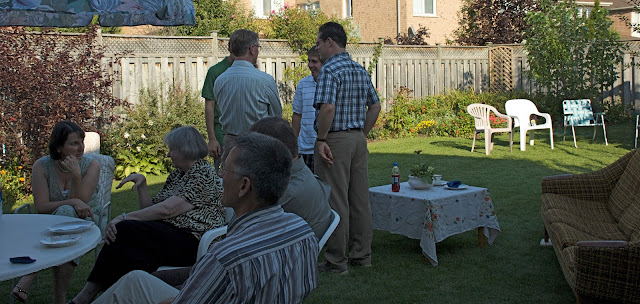
We had fantastic weather for the party and everyone was out in the backyard 


The flower beds that hubby worked so hard to make look their best for the party
The food table with tea, scones with clotted cream and jam, finger sandwiches, fruit, and squares
Books and materials used by my husband in writing his book

Just this past month my husband got word that he has a publisher for another book.  He will be using much of the material from one of the original four volumes, but it will need extensive re-writing, including some new material and an introduction.   

I see another spindle Santa in our future!
Linked to Sentimental Sunday at Sit Relax and Read

Monday, November 29, 2010

Our Christmas Mantel

I was on a roll once I made the twine letters to spell the word JOY and just had to decorate the mantel for Christmas.  

I went for a simple paired-back look to match the simplicity of the twine letters.  Here's how it looks,


and how it used to look just last week and for all the past weeks of the year.


We took down the etching and put up the pinecone wreath.  In past years we've had a red plaid ribbon on the wreath, but it never went very well with the browns and golds of the sofa that is nearby so this year I switched out the bow for a new one.


I made these twine letters recently which you can read about here.


I put the spindle Santas on the mantel.  I know some of you have asked about how and why I bought them and I've just written the post.  Come back tomorrow for details.


The only thing I haven't added yet are the stockings.  It seemed a bit early to get them out (not to mention I'm not sure what box they are in).  Here's a photo of them from last year, so you'll just have to imagine them hung by the fire with care.


We still have a lot more Christmas decorating to do, which is a little bit daunting and a whole lot of fun.

Linked to Metamorphosis Monday at Between Naps on the Porch
A Bavarian Christmas at Doberman's by the Sea
Holiday Home Linky Party at The Lettered Cottage 
Countdown to Christmas Party at Domestically Speaking

Saturday, November 27, 2010

Letters Made From Twine

I have been loving all the burlap and twine and jute used in home decorating this year and having been itching to make something with them.  The other day inspiration struck - I would make twine letters for the mantel to spell the word JOY. 


So I did!  Then I had to decorate the rest of the mantel for Christmas so the new twine word had an appropriate backdrop.  

It was very simple to make and involved using cardboard, glue and twine.  That's it - how hard could that be.

First I drew the letters on a cardboard box I had lying around.  The letters needed to be big and chunky and the ends of the letters needed to be rounded for my idea to work.

Here's the 'J'.


and the 'YO'.


Then I cut the letters out,


and made holes near the ends of the straight parts of the letters.  The hole in the picture below was actually too small and I had to keep enlarging it as I went along so there was enough room for the twine.


Then I wound tape around the end of the twine so that it was stiff enough to sew with.


Then I sewed the twine through the hole in a radiating fashion around the curved ends of the letters to give them a finished look.  I'm afraid I missed taking a picture of the end of the letter before I started winding twine down the arm, so I hope you understand what I mean.  It was all very exciting and hard to stop and take photos.  I applied white glue to the cardboard so that the twine would stay in place and glued and tucked the twine ends under another row of twine.  I pressed the twine into the glue with my thumb as I went along.  

Once I had finished the ends I slowly wound the twine along the arm of the letters.


I did both the "Y" and the "J" the same way.  The "O" involved winding the twine through the opening in the centre of the "O". 


There you have it - some lovely jute letters!  I have them on my mantel and am loving the simplicity of the the word and the texture of the twine. 


A few tips I learned along the way:

1)  Do not ask your husband and 16 year old son if they think you should undertake the project.    When I asked them what word they wanted me to spell my husband thought none as he wasn't convinced the project would look any good and William said any word as long as it was in Russian so he couldn't read it.  Sigh!  Now I have to say both of the naysayers have complimented me on how well the finished project turned out (although William maintains a Russian word would have been cooler). 

2)  Make sure the opening at the centre of a closed letter, like "O" is large enough to put the whole twine roll through - otherwise you will have a mess of twine everywhere.

3)  A little dot of sticky tack holds rolly letters, like "J" upright.  If you look closely at the right hand side of the base of the "J", in the photo above, you can see a white dot of sticky tack.

4)  Choose a short word.  It takes a lot of winding to make each letter and who wants a project that takes more than a couple of hours to complete.  I'm just saying ... 

Linked to Show and Tell Saturday at Be Different Act Normal
Sunday Showcase at Under the Table and Dreaming
Make it 4 Monday at Cottage Instincts
Just Something I Whipped Up at Cottage Instincts
Craftomaniac Monday Link Party at Craft-O-Maniac
Making the World Cuter Monday at Making the World Cuter
Tuesday's Treasures at My Uncommon Slice of Suburbia
Friday Remodelaholic at Remodelaholic
Best of 2010 Blog Party - Crafts at House of Grace

Wednesday, November 24, 2010

Making a Photo Calendar

I took lots of photos when our friends from France were here this past summer - no surprise really - and thought that making a photo calendar would be a great present to send them for Christmas.  The postal deadline is fast approaching and I'm just putting the finishing touches on their calendar.  From my experience making a photo calendar using Smilebox is really no more complicated than blogging and is a very personal gift for someone special.  

A couple of months ago I decided I wanted to see what other types of calendars you could make using on-line or purchased software.  I googled and googled and was very surprised with what I found.   Even the most popular companies showed very few examples of finished calendars and many of them involved a lot of on-line scrapbooking.  While I admire scrapbooking done well, it was more work than I was interested in doing.  The reason I like Smilebox is that it provides pre-set layouts and you just drop your photos into the layout for a very professional looking finished product.  I'm sure you can guess that I used Smilebox again this year.

I wanted to show you just how easy it is to produce fanastic calendars (and I'm not being compensated in any way by Smilebox for writing this).  You can read a previous post with some tips for making great Smilebox calendars here.

To get started making a Smilebox calendar you need to up-load your photos.  In the screen shot below you can see my up-loaded photos down the lefthand side of the screen.  Don't hold back when you're up-loading photos.  The more the merrier is the rule so you can try different photos in various layouts to see what looks best.

Layout for three photos - 


Speaking of layouts, you can choose ones for 1, 2, 3, 4, 5, and 7 photos.  There are five different layouts if you only want to use one photo - but where's the fun in that.  If you want to use two, three, or four photos there are two choices of layouts and if you want to use five or seven photos then there is only a choice of one layout for each.  I have included screen shots of both of the layouts for three photos so you can get an idea of how the layouts vary.  The layout above is in the "personalize" mode for adding and adjusting photos, while all the other screen shots I included show the layouts in the "preview" mode.

Layout for three photos -


Did you notice that the font colour is different for each month.  The last thing I do before I finish a calendar is to go through and match the font to different colours in the photos on that page.

Layout for four photos -


Layout for five photos - 

I love how the name of the month goes across the photo in the layout pictured above.  However, it wouldn't do to have July written across someone's face, so you have to carefully choose the right photo for that spot.

Layout for seven photos - 


I'm off to load the calendar onto a memory stick and take it to a local photocopy store to have it colour-copied onto cardstock and cerlox binding applied.  Then it is off to France with a couple of candy canes (did you know they don't have candy canes in France).  Joyeux Noël to our lovely French friends and may you enjoy a little reminder of Canada every month.


Linked to Strut Your Stuff Thursday at Somewhat Simple

Tuesday, November 23, 2010

Various Things

This is how things are right now:

1)  I'm a famous photographer.  Okay so I'm kidding, but I was pretty happy to see three photos taken by me, were used by Gwen McAuley in her post on the Canadian House and Home website about the Toronto Blogger's Meet-up.  It was so exciting to see my name - well my blog's name - associated with one of my favourite magazines.

2) I'm enjoying candles at dinner every evening thanks to the early sunset at this time of year.


3)  I have a cast-iron frying pan on the floor of my front hall.  I know I've got your curiosity piqued, haven't I?  Let me explain -


A few days ago I was walking Juno and I saw a cast-iron frying pan on someone's front lawn.  It was quite close to the sidewalk and just sitting there.  I continued on my way, but couldn't stop thinking about the frying pan.  About an hour later I had to go out so I decided to drive by the house and see if the frying pan was still there.  Well it was and the owner's car was now in the driveway.  The only thing I can think of is that they had put the frying pan into the recycling the day before and it had been tossed out by the garbage collectors.  

The truly remarkable part of the story is that a friend of mine, who finds herself with very limited funds right now, had just been telling me what she was going to ask her kids to get her for Christmas.  She was trying to be both frugal and practical so she only had a cast-iron frying pan and a second tablecloth for their dining room table on her list.  Can you believe that I found one of her presents as a curbside freebie.   The frying pan is in great shape and just needs a good cleaning.  For some unusual reason it came complete with three pennies in it.    

Isn't that the most remarkable story - an early Christmas blessing!


*******************************************

Just a reminder to enter the giveaway to win these magazines (you can find details here).  These are two fantastic Christmas issues of my favourite decorating magazines.  Don't miss out!


Sunday, November 21, 2010

Toronto Design Bloggers Meet-up and a Giveaway


Last night I attended the Toronto Design Bloggers meet-up.  It was great fun and I'm so happy to have met such interesting talented women and found some great new blogs.  

The event was held at the Hotel le Germain in Toronto. It was the perfect venue - modern, cool and very hip - much like me!  Just kidding, but have a look at the pretty shelves in the lobby.  I love the mirrored backing, the square shape of the shelves, and the restrained placement of glassware.

Over 50 bloggers attended, which was a bit of shock to me that there were that many bloggers in the Southern Ontario area.  Now a few of us design-wannabe bloggers, like myself, attended as well so it wasn't strictly design bloggers.

Thanks so much to Vie from Verdigris Vie, Daniella from Dress Design Decor, and Jennifer from Rambling Renovator and anyone else I missed, for making this such an outstanding evening.  They found sponsors for the evening, including GK hair (the representative who spoke had the most gorgeous hair) and Delta faucets (who have a new one-week old blog called Beige is Dead).  Greenery, decorating the tables, was provided by Coriander Girl and photos were being taken by Natalie of A Bit of Blue.  There were also giveaways and lootbags, but more about that later.


I have to confess that for weeks I have been both excited and nervous about going, but as the event got closer I got progressively more nervous.  When I entered the room and did the old look-around-to see-who-I-know, there was nobody I recognized.  I almost turned around and walked out, but I convinced myself to stay for ten minutes and if I didn't find somebody to talk to I would leave.  I'm so glad I stayed as look at all the cuties I met and chatted and laughed with. 

Kelly from Jax does Design, Tara from The Cinnamon Post, Vanessa from Decor Happy, Emma from The Marion House Book,  Jennifer from Rambling Renovator, and Lindsay from Aubrey+Lindsay

See here's proof that I was there (well along with the somewhat blurry photos I am posting due to the low light conditions).

Lindsay from Aubrey + Lindsay, Sarah from White Blossom, and me (do you like how my shawl matches the room decor - see the drapes in the above photo.  Does that make me a wallflower?  Just kidding)

As I mentioned before there were giveaways like hair products, showerheads, design books, and cookbooks. I even won something, which I'm very excited about:


Looks like I'm going to be dressing up and partying with the cool kids in Toronto.  I had no idea this was going to be such a season of stepping out for me.  I'm totally pumped about it.

There were also sweet lootbags.


Look at all the loot we got - there is a ticket to the One of a Kind craft show, a coupon for 10% off Pistachio Eco Essentials store, a free alphabet print from Lindsay at Penny People, some GK Hair hair products and hair brush, and the Christmas issue of Canadian House and Home and Style at Home magazines.  Amazing, eh?


I'm a bit of a magazing junky so I already have these two magazines (thanks Mom and Dad for renewing my subscriptions every year for Christmas).  Sooo, I was thinking I would pass these two magazines on to some of my readers.   

Here are the giveaway details:
I will give the magazines to two separate people so let me know in a comment which one would you prefer to get (and if you both want the same one I'll have to do rock-paper-scissors with myself to pick).  I'm going to limit this draw to Canada and the USA because of shipping costs.   All you have to do is leave me a comment below, making sure you leave me your email address so I can contact you, and I will select two winners on Friday, November 26th (that way you will get the magazine in time to enjoy it before Christmas).  You're in for a treat as these are both outstanding issues!