I took lots of photos when our friends from France were here this past summer - no surprise really - and thought that making a photo calendar would be a great present to send them for Christmas. The postal deadline is fast approaching and I'm just putting the finishing touches on their calendar. From my experience making a photo calendar using Smilebox is really no more complicated than blogging and is a very personal gift for someone special.
A couple of months ago I decided I wanted to see what other types of calendars you could make using on-line or purchased software. I googled and googled and was very surprised with what I found. Even the most popular companies showed very few examples of finished calendars and many of them involved a lot of on-line scrapbooking. While I admire scrapbooking done well, it was more work than I was interested in doing. The reason I like Smilebox is that it provides pre-set layouts and you just drop your photos into the layout for a very professional looking finished product. I'm sure you can guess that I used Smilebox again this year.
I wanted to show you just how easy it is to produce fanastic calendars (and I'm not being compensated in any way by Smilebox for writing this). You can read a previous post with some tips for making great Smilebox calendars here.
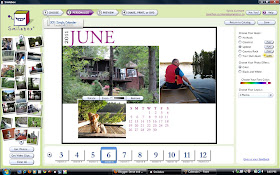
To get started making a Smilebox calendar you need to up-load your photos. In the screen shot below you can see my up-loaded photos down the lefthand side of the screen. Don't hold back when you're up-loading photos. The more the merrier is the rule so you can try different photos in various layouts to see what looks best.
Layout for three photos -
Speaking of layouts, you can choose ones for 1, 2, 3, 4, 5, and 7 photos. There are five different layouts if you only want to use one photo - but where's the fun in that. If you want to use two, three, or four photos there are two choices of layouts and if you want to use five or seven photos then there is only a choice of one layout for each. I have included screen shots of both of the layouts for three photos so you can get an idea of how the layouts vary. The layout above is in the "personalize" mode for adding and adjusting photos, while all the other screen shots I included show the layouts in the "preview" mode.
Layout for three photos -
Did you notice that the font colour is different for each month. The last thing I do before I finish a calendar is to go through and match the font to different colours in the photos on that page.
Layout for four photos -
Layout for five photos -
I love how the name of the month goes across the photo in the layout pictured above. However, it wouldn't do to have July written across someone's face, so you have to carefully choose the right photo for that spot.
Layout for seven photos -
I'm off to load the calendar onto a memory stick and take it to a local photocopy store to have it colour-copied onto cardstock and cerlox binding applied. Then it is off to France with a couple of candy canes (did you know they don't have candy canes in France). Joyeux Noël to our lovely French friends and may you enjoy a little reminder of Canada every month.
Linked to Strut Your Stuff Thursday at Somewhat Simple


Grace, that is simply genius! I'm going to check that out for sure :)
ReplyDeleteGreat project Grace!! I think my next calendars will be done this way...instead of scrapbook style! Angie xo
ReplyDeleteThat's such a great gift and so very thoughtful of you!
ReplyDeleteGreat tutorial! My SIL makes family calendars every year listing all birthdays, anniversaries, etc. Very handy!
ReplyDeleteThanks for such nice idea. Customized photo calendar makes a really wonderful gift.
ReplyDelete