Pages

Thursday, October 31, 2013

McIntosh Apples and Roasted Apple Pork Tenderloin Recipe


Did you know there are over 7,500 varieties of apples (check out this chart for descriptions of many of them). Now that's a lot of apples!  Do you have a favourite type? 

I'm always interested in trying new varieties of apples, but every fall I look forward to enjoying one of my favourites - the McIntosh. This year has been particularly good for apples and boy have I been enjoying McIntosh apples recently. I have one every day in my lunch at work.  They are juicy and crisp and just the right amount of sweetness. They are a lovely blend of green and red and are good for both eating and cooking.


The McIntosh apple has an interesting history. 

Apples were introduced in the 1600s to Canada when settlers planted them in Nova Scotia and then they gradually spread inland from there.  In 1811, when John McIntosh was clearing his land  in Dundela, Upper Canada (south of Ottawa, Ontario), he discovered some wild apple seedlings on his farm.  One in particular was of exceptional quality and the family transplanted it to grow near the farmhouse.  After some trial and error in grafting, they began to sell the fruit and tree stock. By 1900 the McIntosh was the most popular apple in northeastern North America, but since the 1960s has lost favour to other newer cultivars.  

The original McIntosh tree was damaged in a house fire in 1894 and finally died in 1910. Grafts from the original tree are grown in orchards all over North America.  The last known first-generation McIntosh graft (a cutting from the original tree) died in the summer of 2011 - two hundred years after the original tree was found!  You can read more about it here.


And in case you are as in love with the crop of new apples as I am, here's a recipe for you that we enjoyed last weekend.  It is one of the best pork tenderloin recipes I have tasted as the apple-onion mix was a perfect companion to the wonderfully moist pork.

ROASTED APPLE PORK TENDERLOIN (simplified and adapted from here)

INGREDIENTS

750 gm (1 1/5 lbs) pork tenderloins
2 tablespoons vegetable oil, plus more as needed
2 apples, peeled, cored, and sliced (I used McIntosh)
2 onions, chopped
1 cup cranberries
1 tablespoon chopped fresh thyme leaves
1/4 teaspoon ground black pepper
1 cup chicken stock

METHOD
1.  Heat the oil in a frying pan over medium heat and sear the pork for 12 minutes turning frequently

2. Remove the pork to a plate and add the onions and apples to the frying pan and cook for about 8 minutes.  Then add the cranberries, thyme, and pepper and cook for an additional 2 minutes or until the onions are soft.
3.  Meanwhile heat the oven to 425F (220C).  I used a cast iron frying pan so it could go from the stove top to the oven, but if you are not using an ovenproof frying pan then you need to transfer the onion-apple mixture to an ovenproof dish and place the pork on top.
4.  Cook in the oven for 10-15 minutes or until the roast reaches an internal temperature of 150F (65C).
5.  Remove the pork to a plate, cover it, and let it rest for 10 minutes.
6.  Meanwhile heat the onion-apple mixture over medium heat on the stove and add 1 cup of chicken stock. Cook until reduced by half or thickened.
7.  Slice pork and serve on a bed of onion-apple mixture.


What's your favourite apple?  Do you eat McIntosh apples?  

P.S.  Did you notice the spelling of McIntosh apples?  I had assumed they would be spelled MacIntosh because the computers named after them are called Macs, but apparently Apple changed the spelling so it worked better in the short form. 

Monday, October 28, 2013

More Pumpkin Carving


We carved a pumpkin in art class again this year (You can see the pumpkin I carved last year here).  It is such a fun, low pressure activity.  I really don't stress over my design as I know it will be in the compost bin in a weeks time. This year I went with a ginkgoesque type leaf.  I love ginkgo trees so this seemed like a fun image to wind around my pumpkin.

These little pie pumpkins got turned ...


into these ... and then we had a little impromptu pumpkin photo-shoot.


I love adding a carved pumpkins to our front porch as it is a little different than the usual jack-o-lantern and I'm much more into pretty than scary.  I also bought a pumpkin and an assortment of squashes to decorate with.  The squash have the advantage that we can eat them when Hallowe'en is done (we don't eat the pumpkins that we carve as they are watery - grown more for size than taste).  


Have you carved your pumpkins yet?

Saturday, October 26, 2013

Today is Bouquet Day


There are a lot of beginnings and endings in this post.  These are probably the last of the flowers/leaves from the garden. We've already had a frost and there really wasn't much to pick today so I doubt there will be anything left by next week.   You never know what I'll find though - I'm a good scrounger.

Today's bouquet is a collection of the last of this and the last of that.  I found the goldenrod growing in our window well and the warmth from the house had prolonged its season.  The nasturtium and the rudbeckia flowers were the very last ones growing in the garden.  There were only a handful of Japanese lanterns left and most had been damaged by the frost.  The amur maple and spirea leaves are almost completely red now and will be dropping from the bushes soon.  Only the rose hips will remain throughout the winter.

I had to use the fall runner again this week because it will only be appropriate for a short while longer and then we will be on to Christmas.

The other thing I'm running out of, apart from flowers, is daylight.  I hurried last night after work to pick the flowers and take some photos, but I had to retake most of them again today in the daylight. Which is a lovely segue to my notable first.  The last photo was taken with my camera on manual setting - tada!!!  I was playing around with the settings so I could let more light in (I can't wow you with any technical language) and it did really help.  I'm going to have to get my tripod out and try some more like that.

I'm curious to see if I can find any flowers in the garden next week or will I be buying them from the grocery store?

Do you have big plans for the weekend?  Are you dressing up and going to a Hallowe'en party?  I have smaller plans that involve visiting family and friends and no costume, which suits me fine. 

Thursday, October 24, 2013

Fall DIY Table Runner


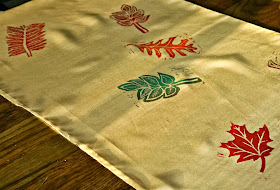
The other day I showed you the fall runner I made in art class.  It was so much fun to make that I wanted to show you how we did it. Our runners were a group project and now I have a memento of all the pretty leaves made by my friends.

I went to art class a little early this week so I could take some pictures of the materials we used to make the runners.  The process was very simple and didn't involve too many specialized tools.


You need the following:
1. A high-density rubber block in the size you want to make your design
2. Carving tools
3. A glass picture frame (the type without a frame) that we used to roll our paint on
4. Roller (although technically you could apply the paint to the glass with a paintbrush

We looked up leaf shapes in some tree and shrub books (well I did anyway because I'm a bit of a botany nut and wanted to make a real leaf shape).  First we sketched the leaf on some waxed paper and then transferred that to the rubber block.  Then we carved the leaf.  The only tricky part is that you have to consider that the ink will only be on the raised portions and you cut away the part that won't have any ink showing.  

Once our leaves were carved we rolled acrylic paint onto the glass - sometimes using more than one colour - and pressed our rubber leaf stamp into the paint.  It was so exciting to see the stamp with ink on it for the first time.  Then we stamped everyone's leaves on each other's runners so we had a complete forest of leaves.  You have to make sure to apply enough ink, but not too much, so that all the details show up.  You also need to press evenly across the stamp when you apply it to the fabric.  We didn't mind if they weren't perfect though, as real fall leaves aren't perfect.

(I made the maple leaf at the top and the oak leaf at the bottom) 


Before stamping on the runner fabric I practiced on a piece of paper which I proudly hung on our fridge (like I'm in kindergarten all over again).


We're going to make another runner soon in a Christmas design because we all enjoyed making them so much. They really aren't difficult and would make great gifts for friends and family.

Tuesday, October 22, 2013

A Sweet Note and a Fall Wreath


A few weeks ago I sent these candy posters off to Kate and William who are away at University. I know being away from home during family holidays like Thanksgiving can be difficult so I thought a "sweet" care package would be just the thing.

I stood in Shoppers Drug Mart for ages trying to select the best chocolates and candies - ones that I could work a silly note around.  I didn't have it written ahead of time, it was more like I wrote the note to match the candy I found (which you will probably be able to tell when you read the note below).  It actually wasn't the easiest thing to write as you can see by my arrows and crazy writing all over the place, but I'm sure the kids got the hang of it and enjoyed the treats.

In case you are interested, and/or want to steal some of the wording for a candy poster of your own, this is what it says:
Happy Thanksgiving/Hallowe'en:
This is just a little note and a few treats to give you some EXTRA love.  I know school can be EXTRA stressful, but taking an EXTRA break can be a real LIFESAVER. Having a few SNICKERS with your friends in the HALLS at university can make all the difference.  You have the SMARTIES so don't let the workload give you the SCARIES. I say relax and ponder the deeper questions, like do you want COFFEE CRISP or with DAIRY MILK?  Personally I am a milk-in-my-coffee sort myself.  Love you to MARS and back.  Miss you lots.  love,Mom

And in other news - I finally found a fall wreath for our front door.  It's not that I've been looking and looking and not been able to find one.  It was more like I've been wanting one and thinking about how I'd like a wreath that had bittersweet berries on it and seeing pretty wreaths all over blogland and a wreath didn't magically appear on our door.  Then I happened to be at the grocery store on the weekend and found this one for 50% off because it was a little damaged - nothing some reddish paint couldn't fix though.  I love the colour of the berries with the door and brick and now I can relax and stop pondering our naked front door.


Friday, October 18, 2013

Today is Bouquet Day


I've been waiting all week to gather this bouquet together.  Last week we made the runner in art class and I was keen to use it on the table with some fall leaves.  You can see in the last photo that the Amur Maple tree in our backyard is just starting to turn red so it was perfect timing and I was able to cut the tips of some of the branches for the bouquet.  

The leaf table runners were a really fun project.  We each made a linoleum stamp of a different leaf and then we printed them on each other's runners.  Who wants a runner with only one type of leaf - its all about variety.  And now we have a great memento of everyone in our class too.  I'm going to take some photos of the stamps and then I'll show you how we did it so you can try the project if you are interested.  We're also going to make some winter/Christmas themed stamps soon too.  Oh, and in case you are curious, my stamp is the maple leaf.  I felt strongly that we needed a maple leaf on our fall runner so I took that one on.

I took the photos of our table this morning before going to work.  The sun was just getting up and the lighting was beautiful.  Don't you love the early morning light?  Amazing, right?  And the morning light is especially gorgeous when it is shining through red leaves.  I always feel that one of the perks of fall is that the sun gets up at a time when I'm actually awake and can enjoy the sunrise.  

Do you have something fun planned for the weekend?  I'm going to lay low and get some projects done and relax a bit.

Thursday, October 17, 2013

Visiting Toronto Island


A few weeks ago a friend and I spent the day wandering around Toronto Island taking photos and sketching (you can read more here).  Her family lived on the island when she was born. She doesn't remember living there as they moved when she was only three, but it fueled our imaginations and we spent the day picturing what it would be like to live on Toronto Island.  

You would be living in a small community of around 600 residents surrounded by large areas of parkland, beaches, and wilderness all the while living right across the harbour from a large city. 


There is only one way to get to and from the island - by boat.  The hourly ferry is the main means of transportation for the islanders to get to the city for work or shopping.


Cars are not allowed on the island so you rely on your bicycle and a cart to move goods around. 


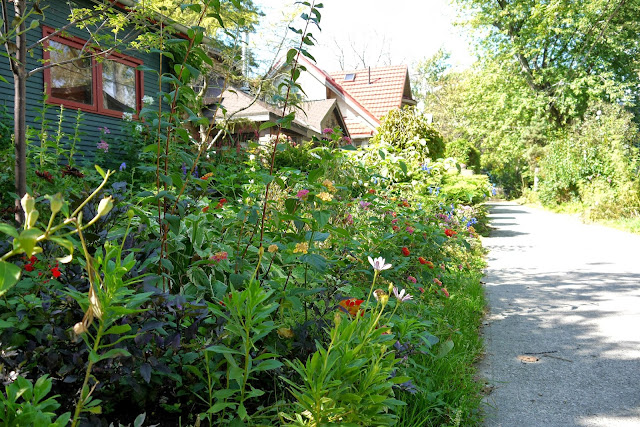
There are no roads only pathways with houses along either side.


There are no shops on the island so planning ahead is crucial.  There is one restaurant, one church, and one school.  Life is quiet here.


Although we refer to it as Toronto Island, they are in fact a series of islands linked together by bridges. The islands were originally a peninsula that became separate from the mainland in a huge storm in 1858.  When the City of Toronto acquired the islands in 1867, an amusement park and summer cottages were built on it.  During World War Two there was a housing crisis in Toronto so some of the cottages were winterized and people began living on the islands year round.  After the war was over the city wanted to demolish all the cottages and turn the islands into parkland.  The ensuing dispute between the city and the residents was finally settled in 1994 when the province signed 99-year leases with the Toronto Island residents.

There are only about 300 houses left on the island (down from a peak of 630 homes in the 1950s).  I took pictures of approximately 295 of them.  Lets have a look.

While we saw a few modern houses,


most were wooden clapboard cottages.


They were painted a variety of colour combinations with no two the same.


There were pretty gardens


and flower boxes on windows.


There were artistic decorative touches on many of the homes.


There were interesting roof lines,


and windows,


and porches.


The houses ranged from tiny cottages


to somewhat larger homes although none were huge.


 It is amazing to think that this scene


is across the pathway from this scene.


Would island life agree with you?