Pages

Sunday, September 29, 2013

Inexpensive Tools for Outdoor Painting and Sketching


A new hobby means new tools - and that is certainly true for my new hobby of sketching and painting.  A friend and I have gone on a few outings to take photos and do some art.  I love those days.  I love exploring new areas and capturing them with my camera and now through art.

I have started to gather together a collection of portable tools that I need to sketch and do watercolour painting so they are handy and ready to go.  I don't want to spend a fortune on the tools I need so I have found some objects around the house that I can use and I thought I would share.  


Starting from the top going clockwise:

SPIT BOX
My friend made me a spit box (which you can see in more detail in the photo below).  What is a spit box (and why is it called that), you ask?  A spit box is a portable watercolour paint kit and it is called a spit box because if you don't have any water ... well, I'm sure you can figure out the rest. Don't worry, we use water from our water bottles or the lake so there is no spitting involved with our spit boxes.

My friend used a Dentyne gum package after she emptied the gum out (which she gave to me in a baggie).  She said you could also use a daily pill dispenser or an old make-up container or any other container with lots of little compartments.  

The spit box is made using water colour paints that come in tubes.  You fill each section of the container about half full with paint and then add another quarter with boiled water (so you don't grow mold) that has cooled. Then you use a tooth pick or other small implement and gently stir the paint and water so that it is completely blended. Stirring in a figure 8 helps avoid splashing. Let the paint dry completely and you have a travel-size paint container.  


My friend recommended that you include the three primary colors (blue, red, and yellow) and possibly some secondary colours (orange, green, purple) although they can be made by mixing the primary colours together.  In addition, you might want to include a few types of each of the primary colours, such as:

  • Blue: French ultramarine and cobalt blue
  • Red: cadmium red and alizarin crimson
  • Yellow: cadmium lemon yellow and cadmium yellow deep

And finally she suggested including burnt umber as it is a very useful colour on its own and works to create a "black" when mixed with other colours. 

If there is a place to mix colours on the lid of the container then you can fill all the slots with paint, but if there isn't a place to mix (like with mine) then you need to leave some parts of the tray open so they can be used for mixing colours.  My spit box has orange, brown, green, red, yellow, and blue (not sure of the exact shades of each).


BRUSH
My friend suggested you may want to use a #4 round brush, but you can choose whatever type feels most comfortable. She also suggested that you can break the brush's handle in half so that it is about the same size as your spit box and thus easier to fit in your bag.  You can sand the end so that it doesn't cause any damage.  Of course, the bristles are the most important part of a paint brush and are at risk of being damaged when you put them in a bag.  A great way to protect the bristles is to store the end of the brush in one of those little vials that you put on the stem of a single blossom.  I didn't even take the round lid off the brush when I was painting as I didn't want to lose it and then the brush was ready to be stored again afterward.


SHARPIE AND SKETCHING PENCIL
I've been on a sketching-with-an-ultra-fine-Sharpie kick. I like how it looks like an ink drawing and you can paint over the Sharpie without the ink running.  I have yet to use my pencil to sketch.  For that matter I have yet to get a proper sketching pencil(s).

PLASTIC LID
I use a cottage cheese container lid (although you can use any shape or size that you want) to draw circles that I use to frame my sketches.  I already owned a large-size sketch book that I wanted to use, but the pages seemed too big for one sketch.  By drawing 2 or 3 circles on a page I can sketch/paint several smaller pictures (you can see some examples at the end of the post).  I think they look like portholes or binoculars looking at a scene.

SMALL PLASTIC CONTAINER TO HOLD WATER WHILE PAINTING
Look for a container that has a low profile so it fits into your bag without being lumpy.  Mine is a dog food container and is about an inch high and fairly sturdy so it won't get crushed in the bag. 

WISH LIST
I would like to get a smaller sketch pad and some sketching pencils. Anyone have any other suggestions?  I'm new to this so let me know if you have a great travel art tool.


My friend and I went to Toronto Island this weekend and did some exploring and sketching and painting.  I really enjoy it even though I'm just learning.

It has been years decades since I last visited Toronto Island and I had never been to the residential areas. It was so much fun walking around and checking out all the adorable cottages and homes. I'm working on a post to show you some of them.

Friday, September 27, 2013

Today is Bouquet Day


Hello friends!  One of the things I look forward to every Friday - well apart from it being the start of the weekend and watching TV while we have pizza for dinner - is making a new bouquet for the table. 

I like the process of selecting which flowers/weeds will go with which tablecloth.  The Japanese Lanterns (also called Chinese Lanterns) are at their peak right now so I wanted to use them.  When I went out to the garden to cut some I realized that EVERY single leaf has been nibbled on and is imperfect.  I cut them anyway and somehow it doesn't really show when they are bunched together (isn't that a lovely metaphor for us as individuals and how we look better together than when we stand alone). 

This is the first year I have ever cut the Japanese Lantern flowers and displayed them in a vase.  We usually pick the fruits/flowers (they really are both as inside each of the flowers is an orange fruit) and put them in a bowl.  I'm guessing we will do that later as well.

The tablecloth is a crazy one I bought at the thrift store last year.  It has batiked wavy lines and fish.  Fish?  Crazy I know, but I like it.  I thought the neutral gray would let the orange and green of the Japanese Lantern flowers shine.

Do you have big plans for the weekend? I'm going to Toronto Island with a friend.  I haven't been to the islands for years - decades actually - and am looking forward to enjoying the lovely fall weather and the scenery.

Tuesday, September 24, 2013

More Things I Learned at Blogpodium

I posted some of my thoughts on the inspiring, stylish, motivating, thought-provoking day that was Blogpodium in my last post.  But now for the nitty-gritty of what I actually learned from each of the presentations.  I took notes because lets face it I can't remember my own kid's names so I certainly can't be expected to remember the material from five different presentations and I have a responsibility to all of you to report back.  So here are some of the points that caught my attention at Blogpodium.

Sarah Richardson gave the keynote presentation and it was fabulous.
She encouraged all of us to persevere with decorating and experiment with new ideas because that is what is needed to develop your skills and grow a business. She talked about how she got started and her big break when she had her home featured on the cover of Canadian House and Home in 1998 (I remember that issue and wrote about it here).  Her apartment was decorated with cast-offs and thrift store finds including a lamp that cost $2.50.  

Sarah also talked about upcoming projects she is working on such as a new TV series called Real Potential, a book she is writing, and a collection of fabrics through Kravet that is about to be launched (you can see some of the fabrics in my photo below). She told a funny story about a recent trip to New York City to photograph the new fabric line. Sarah had sent five boxes full of props to be used to style the displays and just as they were leaving to go to the airport they get a call that the boxes had been held up at customs.  So Sarah and her colleagues all quickly gathered props from their own homes. They traveled with treasured bowls and favourite candlesticks in their carry-on luggage so that they wouldn't get broken.  The customs officers must have really wondered about that.

And a few more of Sarah's tidbits: 
  • Decorate so that it lasts.  Sarah said that she likes to be able to look back at a room years from now and still be happy to have her name on it. 
  • Be practical in your decorating.  Sarah likes to balance the practical with some of the finer things.  She described her rooms as casually elegant or classically simple.  
  • Make the main investment pieces neutral and then make a statement by adding colour in items you can change easily. 
  • Be sure to include character and history and fun and whimsy in every room.  One of the best ways to add personality is through seeking out handmade artful objects.
  • Don't over-think the process. Make a decision and then move on because there are a million right answers. If you over-think the decorating you will second guess yourself and end up going over budget.


Waving to Sarah's mother

Samples of Sarah Richardson's new fabric collection through Kravet

During the rest of the day I went to four hour-long sessions. Here's what I learned:


1. Power Tools - How to Clinic (Home Depot)
I learned that we need to buy a mitre saw and a lightweight nail gun.  I got to use both and they were amazing.

You can see the project we were making in the photo above. It was shelf rack with a cover that folds down to form a workspace. Wouldn't it be cute as a craft centre with the shelves lined with little pots of paints or a spice rack to be used in the kitchen.


Avery Swarz

2. Creating a Style Guide for your Blog (Avery Swartz from Avery Swartz Makes Websites)
Avery believes that all bloggers should create a style guide.  It can be anything from a formally written folder, or a pinterest file, or post-it notes stuck to the computer. The style guide should include things like guidelines about your blog's content, logo, colour palette, fonts, how to navigate through the blog, how the links will be indicated, and how the images will be presented. Make your decision on what your blog style will be and then be consistent in using it.

And a few more of Avery's tidbits:
  • 90% of the first impressions about a blog are based on colour 
  • since images take centre-stage on blogs you may want to keep the other colours more neutral
  • have high contrast between the colours of the fonts and the background
  • do not centre align your text or Avery will hunt you down
  • did you know that serif fonts (ones with the little lines at the ends of the letters) are used most often in books because the little hooks help the eye read the words more efficiently, while online it is the opposite and sans-serif fonts (without the little lines) are easier to read.
  • Helvetica is a font that became popular in the 1950s and has been used in the NYC subway. Some typefaces, including Helvetica are really families of fonts. Helvetica has around 50 different fonts within the typeface family, everything from heavy to condensed to italicized. I changed the font of this post to Helvetica from my usual Verdana. What do you think? 
  • You should pick no more than two typefaces - one for the body and one for the decorative contrast. However, you can pick different fonts within the typeface family as they will all look good together. 
Jennifer Ballard
3. Get the Shot!  Photography + Instagram Workshop (Jennifer Ballard from Jennifer Ballard Photography)
Jennifer led us through the intricacies of shutter speed, aperture, and ISO by comparing them to the human eye.  She had great slides to demonstrate how one scene can look different by varying these three settings.  I knew that I needed to get my camera off the auto setting, but until Blogpodium had never figured out how to use the manual settings.  Jennifer had us all give it a try and helped us play around with the different settings.  It was great to begin to get an understanding of what I need to do.

The main tidbits I gained to help with low-lighting conditions (namely all winter long here in Toronto) are:

  • use a reflector to help light objects from the back - even a piece of white britol board will work
  • use an external flash to help avoid red eye and ghost face
  • point the external flash up and backward at the ceiling or wall behind to get diffuse light
  • attach a white card with an elastic band to the top of the flash pointed at the ceiling and a little bit of light will bounce back from the card 
  • use an f-stop of around 2.8
  • use the delay timer to avoid the jiggle that your finger makes depressing the shutter button
Karen Bertelsen
4.  The Art of Monetization (Karen Bertelsen from The Art of Doing Stuff)
I signed up for this presentation because Karen's blog is hilarious and I was hoping for more of the same in her presentation. Fortunately, Karen didn't disappoint - she is a great presenter and I learned lots.  

Not only is Karen funny, but she is the most honest and up-front person I know. She told us how much she earns from blogging and what she charges for different writing and photography projects. It was so refreshing and so helpful because frankly I had no idea what the going rates for some of these things are. She feels that if we talk about the pricing then the power will be in the hands of the blogger rather than in the hands of the companies. Good point.

I really have had limited interest in monetizing my blog as I want to keep it as a hobby, but according to Karen we should all have Google adsense on our blogs because ... well ... why not.  It brings in money without any effort on our part and in fact Karen revealed that it is her top money maker every month. You just sign up and wait for the cheques to come. The cheques will likely be small at first, but as your readership grows and Google figures out your blog then it grows. I thought that was an interesting idea and you just might see some ads on here soon.

So there you have it, one day's contents of my brain unloaded for you. I hope you found a few take-away points too.

Sunday, September 22, 2013

What I Learned at Blogpodium


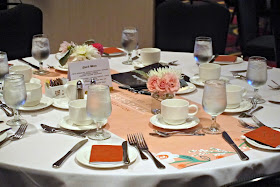
All the gorgeous decorations were made by Shannon from We Create Hoopla who I was lucky enough to sit beside during lunch and the main presentations


Jen from Rambling Renovators is the the founder, CEO, and powerhouse behind Blogpodium
(Ya did an awesome job Jen)


How cute are these salt and pepper pair


I attended my first blogger's conference today. Have you ever been to one? If you have then you might identify with some of my observations (and if you don't agree I would love you to chime in with your thoughts). 

Blogpodium is a Canadian conference for design and lifestyle bloggers.  Overall my day was fantastic and I learned so much (I'll post more about what I learned at the presentations in another post).  I've been to many speech/language conferences for work, but I can tell you that this one was very different. It was much more ... in a word ... stylish.

Here's what I learned (and my observations may apply more to design blogger conferences than other types of blog conferences):


1. Most bloggers are young.

2. Most bloggers are VERY stylish

3. Most bloggers can wear high heels ALL DAY LONG!

4. You will learn A LOT at a conference and come away inspired and full of ideas and in awe of all the talent around you

5. You will have to force yourself to interact far more than you are comfortable with (leading to a long sleep-in on Sunday morning and a day spent in yoga pants doing nothing). Truthfully, unless you are a real people person and are happy entering a room full of 250 strangers and striking up a conversation with someone you don't know, it will be hard work. Going with a friend would have made this part easier as I did find that the constant need to put myself out there to interact and socialize was difficult and draining.

6. The party decor and table settings will knock your socks off (see the pictures above)

7. The food will be amazing and you will consume many calories

8. You will learn how to use your camera and actually take it off the 'auto' setting for the first time since you got your camera over two years ago (oh, wait this one is definitely just me)

9. You will accumulate a lot of swag as you go about your day and visit the sponsor's booths (see #10)

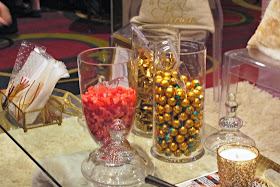
10. The sponsors are phenomenally generous. For example, Home Depot gave away all the tools that we used in the hands-on session (more about that later), Delta Faucets had a little candy bar so we could load up on chocolates and jelly beans, and Tonic Living gave away fabric squares to be used in a contest (I'm brimming over with ideas for it).


It is always difficult to know what to wear to a blogging conference (see #2 above), but good news, I found something and didn't go naked.  The shoes, scarf, and pants were good, but the shirt was a little casual.  Oh well, there was a range of styles and I felt comfortable so it was all good.


More details coming soon about some of the take away ideas I got from the presentations, including Sarah Richardson's address.

Have you ever been to a blogger's conference?  What was your impression?

Friday, September 20, 2013

Today is Bouquet Day


Today is weed day, right? It must be otherwise what was I doing at the park with large scissors in my hand cutting goldenrod and aster from the weeds along the fence. Yes, I admit I have a thing for weeds, especially pretty ones like goldenrod and asters. I did add some butterfly bush and purple salvia from our garden though as I wanted there to be a little more purple in the bouquet.

Do you have anything fun planned for the weekend?  I'm going to Blogpodium tomorrow - a Canadian conference for design and lifestyle bloggers. It was a last minute decision and I'm super excited ... and truth be told a little nervous too at all that mingling and connecting. Sarah Richardson will be giving the keynote address which I'm really looking forward to hearing. I still have to figure out what to wear though. Why is that always so hard?  

I'll let you know all about the conference next week and whether or not I had to go naked (stay tuned).

Wednesday, September 18, 2013

Hello Blue Chair! Hello White Bench!


Have you ever painted furniture that you already loved the colour of?  Crazy isn't it, but the furniture was needed and the colours just weren't right, so I painted them.

In July I bought blue cushions for our family room to coordinate with the light green sofa and wall colour (you can read more about it here)?  The banker's chair that sits across from the sofa was black. While I loved the look of the chair in black, I really felt that the black was too heavy and a dark blue would work better in the room. 

It took me two tries to get the right blue. The first coat was too bright and just didn't get along with the slightly different shades of blue in the cushions and the rug. I took my can of paint back to the store and had them make the paint as close to BM Old Navy as possible and now I love it.


We also found that we needed a coffee table - somewhere to put our drinks and the magazines and the laptop and our feet. I moved the bench from the front porch (which you can see here) into the family room to see how it looked. I liked that it had such a low profile since the sofa - ahem - does not. The only trouble was the bench was painted in a turquoisey blue, which looked great on the front porch, but didn't go well with the blues in the cushions and rug. I realized the bench was the best solution for our feet and drinks so I decided to paint it a creamy white.

Initially I used the same white paint that I had used on the upper kitchen cabinets, but for some reason it seemed very stark white on the bench. Most of the whites in the cushions and the rug are cream or light beige so the white just made them all look dirty ... and that wasn't the look we were after. So I mixed six spoonfuls of a light beige paint I had into some of the white paint and ended up with a softer cream colour that was just right.


It felt funny to paint furniture that I already liked and then end up with both pieces being slightly the wrong colour. Fortunately both were fixable and now make me happy. Do you often take a couple of tries at getting the right colour when you paint?


Linked to Weekend Bloggy Reading at Serenity Now,
Sunday Showcase Party at Stephanie Lynn

Saturday, September 14, 2013

Today is Bouquet Day


This week's bouquet is a mix of flowers from the garden (the roses), berries from shrubs and trees in the garden (high bush cranberry and ornamental crab), and weeds (the Queen Anne's lace). I was so happy to see a few roses lingering on the bushes that I decided to design the whole bouquet around them. Lots of the leaves at this time of the year are mottled and chewed up and even turning colours, but you take what you can get.  

I like the pink roses with the dark red berries (and even the occasional red tinge in the leaves) and especially like how the tablecloth echoes those shades.  I used a thrift store white milk glass vase to display the flowers as I thought the strong colours needed the balance of white.


I love the homeyness of gingham tablecloths. I have quite a few different colours now - thank you thrift stores. This one is a more recent find and I was drawn to the retro daisy border along the edge.  


Our table is almost 100 years old and is an unusual size (44x54 inches) so it is difficult to find tablecloths that fit well. One of the ways I deal with the problem (especially when it comes to the random sizes and shapes you find in a thrift store) is by buying square cloths and turn them on an angle.

I hope you are having a lovely weekend.  And happy pink and red day to you all (I just made that up, but wouldn't it be a fun day)!

Thursday, September 12, 2013

Easy Dinner: Spaghetti Squash and Chicken Casserole


Yeah, it looks like a hot mess on the dinner plate (especially since I forgot to take photos before I started eating), but it tasted so good that I had to share this recipe.  


Have you ever tried spaghetti squash?  I love squash in any shape or form so I knew this recipe would be a winner with me. I served it with corn-on-the-cob and ratatouille, but it actually is a meal-in-one since it has lots of vegetable as well as chicken and cheese and a bread crumb topping.

Speaking of bread crumb toppings - don't you love them?  A casserole without bread crumbs on top is like a hug without the squeeze, it's like apple pie without the cheese, it's like cake without the icing, it's like a pretty outfit without the jewelry... I'm sure you get the idea that it takes an ordinary casserole to the next level so I'm definitely glad this recipe has a bread crumb topping.

There was enough casserole to feed six of us for Sunday dinner and then there were leftovers for the next night too. Now that's my kind of dish.  

INGREDIENTS:
1 spaghetti squash, halved lengthwise and seeded
1/2 cup sunflower seeds
3/4 cup grated Parmesan cheese
1 onion, diced
1-2 tablespoons oil for cooking
1 clove garlic, minced
1 teaspoon ground sage
1 tablespoon fresh thyme leaves
1/4 teaspoon salt
1/4 teaspoon pepper
2 cups cooked chicken, cubed
1 cup bread crumbs
2 tablespoons margarine or butter
2 tablespoons Parmesan cheese

METHOD:
1. Preheat oven to 350F
2. Cook squash cut side down on oiled baking dish for 50 minutes
3. Scrape flesh of squash from the rind using a fork and place in a large bowl
4. Meanwhile saute onions in oil until translucent
5. Add garlic and sunflower seeds and cook for another couple of minutes 
6. Stir the onions, garlic, and sunflower seeds into the squash along with the cheese, spices, and cooked chicken
7.  Spread in an oiled 9x13 casserole dish
8.  Mix the bread crumbs, margarine, and 2 tablespoons of Parmesan cheese together until crumbly.  Spread on top of the casserole
9.  Cover and cook for 20 minutes and then uncover and broil until the bread crumbs are slightly browned (n.b. I forgot to cover mine and it still worked out well).

This recipe is a winner, that's for sure.  I love to write up my favourite recipes on the blog so I can share them with all of you find them again ... but I really hope you enjoy the recipe too ;)

Linked to Inspiration Gallery on House by Hoff,
Weekend Bloggy Reading at Serenity Now